NEW ADDRESS FOR MEMBERS GREYFORUMS.ORG


dibblm
-
Posts
27 -
Joined
-
Last visited
Content Type
Profiles
Forums
Events
Gallery
Everything posted by dibblm
-
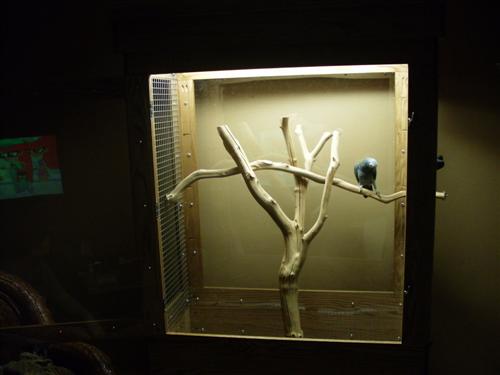
I could take a few more and show you. The Top, Bottom and sides are vented with mesh. I have a few small computer sized fans at the top that run in reverse. This draws the air through the cage and up and out the top instead of blowing on the bird. Im currently waiting on a shipment of walnut at the moment and my plans are to make another but of a different design. This one is needed for a really high end client I heard about that has a fancy study and wants a cage to match it. This will consist of alot of crown molding and custom router work to match what he already has. When I posted that one could be made to spec. That included to match your existing home style, design and decor that most people find important. They want a piece of furniture. Not just a cage.
-
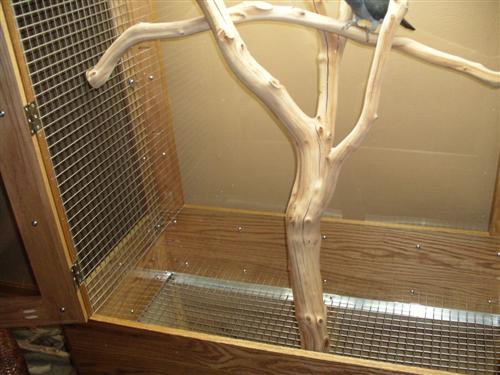
cage dimensions of liveable space are. 72" high 36" deep and 48" wide. Not to advertise here but if you want one. I will soon be building to sell. I can build any design and use any wood you like. The full interior of this design is fully coated with lexan to prevent the bird from chewing the wood which means this can and will last a lifetime.
-
last one.

-
another
-
finished
-
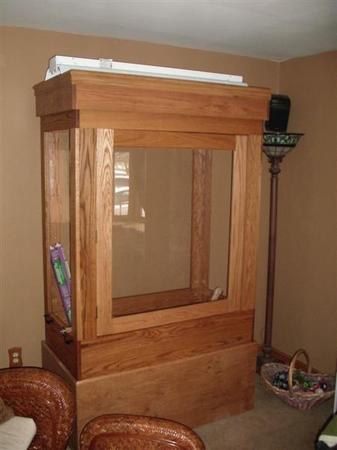
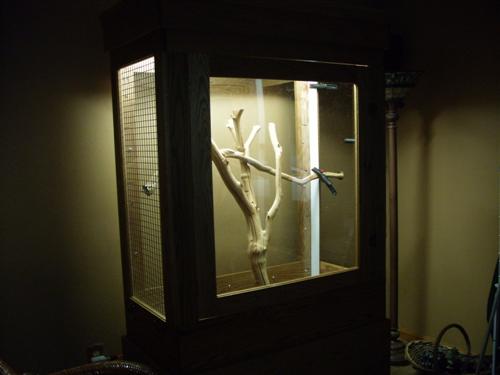
img1. Just finished.
-
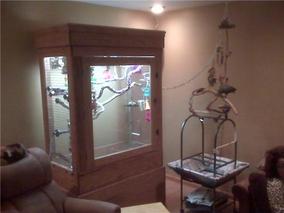
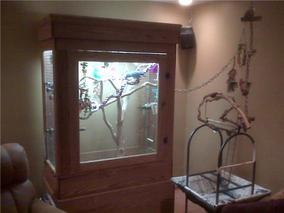
Some have seen these in the beginning stages when I was building this over a year ago. Here is the finished product.
-
Ill add the rest to a new post. Either way. I have about 800.00 invested including the light with timer and the manzanita perches too. Although he doesnt like the perches, my wife does.
-

-
original picture was too large

-
I planned to re-post this after last year adding it to a how-to section. I looked at cagesbydesign and thought their prices were WAY too high and found them to be quite rude on the phone. So I built my own. I have since been in touch with a local aviary that deals in exotic birds and I plan to build and sell them out of his location. Heres and intro picture and I will submit more in a few after I take them.
-
<br><br>Post edited by: dibblm, at: 2009/02/23 04:16
-
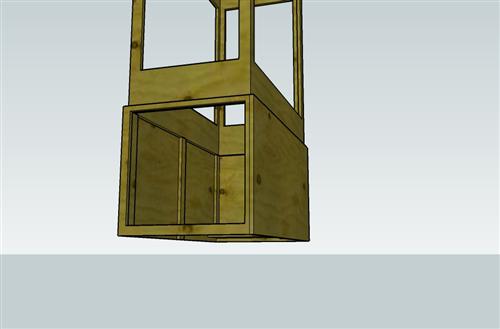
And assembled. Minus the TOP. This mainly shows how the 2 connect and you can see the middle section resting on the supports.<br><br>Post edited by: dibblm, at: 2009/02/23 04:17

-
Here's the middle section
-
base

-
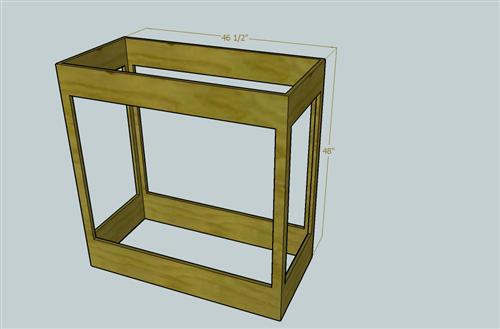
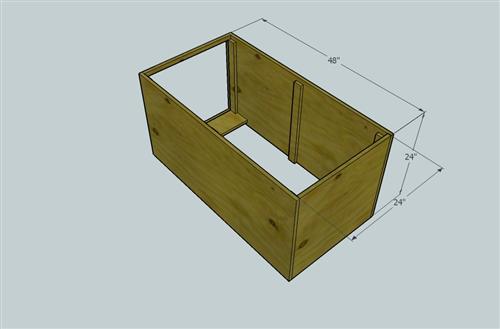
I decided to make some drawings based on my scale. The first is the base. Base Dimensions are : Length: 48" Depth: 24" Height 24" What Im basically trying to show here is how the cage sits in the base. Just resting on the 1 X 2 verticals. The lower braces you see are for the casters and the opening is access to the lower grate, cleanout tray, and storage shelf. This is where I made the mistake. The wife wanted the opening here till we got it into place. Once in place she wished I would have made it in the front with 3 seperate doors to open. I agree and wish myself thats the way i would have designed it. Post edited by: dibblm, at: 2009/02/23 02:44<br><br>Post edited by: dibblm, at: 2009/02/23 02:45

-
Sorry I hadn't posted back. I have a few more pictures to send in and haven't gotten time to upload them. However to those that asked. Yes any AMATEUR can build this. The base was made from 3/4 OAK ply as I didn't want to go through joining 1 X 8's. The Frame is 1 X 4's with a 1 X 6 header and 1 X 12 footer. The joints can be fastened with either a biscuits, dowels, or as I used. Pocket screws. I went to Lowes and bought a 30.00 Kreg pocket joiner kit and made the whole thing in this manner this way any dissasembly could be easily done by just unscrewing it. I will see about making some drawings and posting this way you can have and idea of how it goes together. If anyone has a specific size there looking for let me know and Ill make the drawings to scale based off your needed dimensions. Specialty tools needed: ? Just the Kregg joiner and a miter saw. If you wanted to go all out you could plane all the material to make sure it's all in spec but something this large your able to work around the minuteness of changes. Routing was done but not necessary. It just depends on you.
-
maintenance will be a breeze. The whole inside walls are all acrylic. little water on a rag. Inside wipes clean. Bottom tray slides out. Spray it off and your basically done.
-
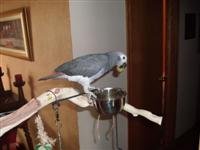
Thanks. As a new owner. That gives me more ideas of what Mine can play with.
-
Thank you for all the great comments. It hasn't been that hard. I have roughly 1000.00 invested. Plus or minus a few here and there. I figured it was gonna be 500-1000 for metal cage. 1000-1500 in SS. My wife by no means is ordinary and she wanted something diffrent and basically told me to go to work. If anyone wants one custom made to whatever size they want give me a shout, I'm not looking to make any money on these because for me it's relaxing and calming. I plan to make a smaller one for a local bird store and put on display and maybe generate some business that way. Also if you look at kingsoloman cages or cagesbydesign. The same (similar) cage is going to run around 3000 - 50000 depending on options. I looked and there was no way I was spending that much when as demonstrated. I could build one for half..
-
Hoping to finish this weekend. Had a hold up on the wire mesh I ordered. First order wasn't what I ordered so I had to wait for replacmeents. Lets see: Whats left to finish. Still need to fabricate the plexiglass layer on the right hand side. Mesh the Right and top. Build a waste tray and a sliding shelf for the food. Then fill with LOTS>>>> of toys...
-
one more.
-
1. <br><br>Post edited by: dibblm, at: 2009/02/12 23:23
-
Posted a couple new pictures. Almost done. <br><br>Post edited by: dibblm, at: 2009/02/12 23:22
-
Well it's almost done. The SS mesh I order was wrong and I am still waiting on replacements for that but for the meantime, I thought I would share with others what they too can build for 1/3 of whats being asked on the Internet. I still need another coat of stain on base. The light needs recessed yet. And locks and a door handle. If anyone needs custom plans made or if you want the plans to make one like this yourself, I would be happy to make any size drawing you like so you can build one yourself. Post edited by: dibblm, at: 2009/02/09 00:41 Post edited by: dibblm, at: 2009/02/09 00:43<br><br>Post edited by: dibblm, at: 2009/02/09 00:43